Getting Started:
![]() GoToMeeting helps its users to organize and participate in online meetings. It hereby eliminates the need to travel and allows business professionals to be more efficient and productive with their time.
GoToMeeting helps its users to organize and participate in online meetings. It hereby eliminates the need to travel and allows business professionals to be more efficient and productive with their time.
GoToMeeting users can easily deliver presentations, collaborate on documents, perform product demonstrations and securely share information from anywhere, at any time. GoToMeeting provides rapid software download, lesser meeting setup time and great user interface. It allows meeting organizers and attendees up and running with their meetings in matter of few seconds.
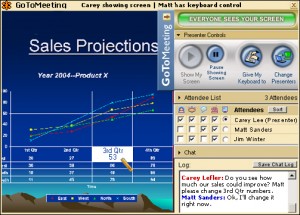 Meeting attendees can view video and the presenter’s desktop in one of the most natural virtual meeting experience.
It helps business owners to effectively budget and manage online meeting costs with no unexpected charges or unnecessary fees.
GoToMeeting allows you to choose between phone conferencing and Voice over Internet Protocol (VoIP) or both.
Also, GoToMeeting users can organize and attend meetings on both PCs and Mac computers.
Basic setup required for GoToMeeting:
– System based on Windows or Mac
– Internet connection (preferably broadband connection)
– Microphone and speakers (best are USB devices)
– Webcam for using with HDFaces
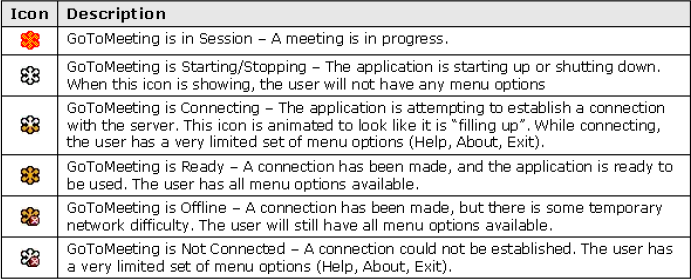
GoToMeeting system Tray Icon
Download and Install GoToMeeting:
Complete guides for downloading and installing the software. Read the hardware and software requirements and recommendations. Before you can continue with the setup and installation process, you need to setup your account. GoToMeeting offers a free 30 day trial.
Create Your Organizer Account – Individual Organizers
– Once ‘Create Your Account’ page opens, fill in your details and click Continue.
– Fill in your password and click Continue.
– If required, enter credit card and billing information and click Get Free Trial.
– On the GoToMeeting Software page, click the ‘Install Our Software’ button.
– Once prompted, click ‘Yes, Grant’ (or ‘Trust’ on a Mac) to accept the download.
Right-click the GoToMeeting’s icon present on system tray and access the desired function.![]()
Meet Now: Allows hosts to start impromptu meetings.
Schedule a Meeting: This allows host to schedule meeting.
 My Meetings: Provides access to currently scheduled meetings and to add, edit or delete scheduled meetings.
Join: Enables to join a meeting already in progress.
Help: Launches online help.
Preferences: Provides access to user preferences.
About: Provides GoToMeeting software version information.
Exit: Closes the GoToMeeting application.
Organize Meetings
Organizer Role:
An organizer can schedule & host meetings, can grant & revoke attendees’ privileges like passing the presenter role and inviting/dismissing attendees.
– Create your account and download the GoToMeeting software on your computer.
– You must be present at the start of any meeting as the meeting host.
– Create scheduled meetings or start impromptu meetings.
– Invite attendees via phone, email or instant message.
– Once the meeting starts, you become the presenter.
– During the meeting, you may pass the role of presenter to other attendees or promote an attendee to co-organizer.
GotoMeeting for mobile devices: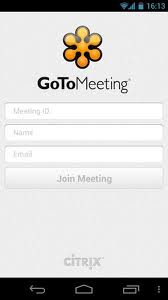
– Attend GoToMeeting sessions from anywhere – free of charge.
– See up to 6 meeting participants on iPads.
– Join meetings in seconds by tapping the Join link present in the invitation email.
– View presentations, reports etc. – whatever the presenter shares on-screen.
– See who’s presenting, who’s talking and who else is attending.
– Connect to audio through your Internet connection (WiFi or 3G), or dial in over the phone.
– Have a Private or Group Chat with attendees in the meeting.
There is no cost for the GoToMeeting app. There’s no charge for attending meetings or webinars.
Users can join the session by using GoToMeeting app and entering their name and Meeting or Webinar ID.
GoToMeeting Integrated Audio:
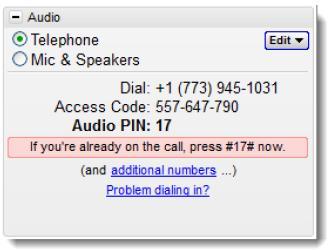 Choose between phone, VoIP and both. Once the meeting starts, the audio details can be found in the Control Panel. GoToMeeting automatically generates a conference call number, access code and Audio PIN for all attendees joining via telephone.
a. Audio Mode: Using Telephone
Dial the conference call number at the specified meeting time. When prompted, enter the access code followed by the # key and then your unique Audio PIN. Once in a conference call, participants and organizers can enter commands using their phone keypads.
b. Audio Mode: Using VoIP Checklist
When using Microphone & Speakers, audio quality can differ on your audio software / hardware manufacturer as well as your operating system. USB headset and USB microphone connected to your computer are of best quality.
c. Select and test your Mic & Speakers
 1. After you’ve logged into the session, select “Mic & Speakers” in the Audio pane of your Control Panel.
2. Click Test.
3. Click OK.
Start/End a Scheduled Meeting:
Scheduled meetings are sessions previously scheduled by the organizer. They can be started from the GoToMeeting PC system tray icon, the Mac GoToMeeting Suite icon, the GoToMeeting Web site and the GoToMeeting Outlook bar.
To start a scheduled meeting from your desktop
1. To start, right-click the icon that is present on system tray. Or double-click the GoToMeeting Suite icon on a Mac and select My Meetings.
2. Enter your Email and Password in the Login window, and click ‘Log In’.
3. On ‘My Meetings’ window, select the meeting you want to start by selecting the name in the Subject column and then click the Start button.
4. Your meeting will start and the GoToMeeting Organizer Control Panel will appear on the right side of your desktop.
To start a scheduled meeting from the GoToMeeting website
1. On the My Meetings page, select the scheduled meeting you wish to start and click the Start Meeting button.
2. If prompted, click ‘Yes’ or ‘Grant’ to accept the GoToMeeting download.
3. Your meeting begins and the GoToMeeting Organizer Control Panel appears in the right side of your desktop.
To start a scheduled meeting from the GoToMeeting Outlook bar
1. From the GoToMeeting toolbar in Outlook, click the GoToMeeting button and select My Meetings.
2. On the Login window, enter your Email and Password and click Log In.
3. On the My Meetings window, click the name of the meeting in the Subject column, and click the Start button.
4. Your meeting begins and the GoToMeeting Organizer Control Panel appears in the right side of your desktop.
To start a scheduled meeting from the GoToMeeting IBM Lotus Notes Actions menu
1. From the Actions menu in the Lotus Notes toolbar, select ‘My GoToMeetings’.
2. On the Login window enter your Email address and Password and click Log In.
3. On the My Meetings window, select the meeting you want to start by clicking the name in the Subject column, and click the Start button.
4. Your meeting will start and the GoToMeeting Organizer Control Panel will appear on the right side of your desktop.
To start a scheduled meeting from the GoToMeeting Toolbar in Microsoft Office
1. From the GoToMeeting toolbar in Microsoft Office, click the GoToMeeting button and select My Meetings. On the Login window, enter your Email address and Password and click Log In.
2. On the My Meetings window, select the meeting you want to start by clicking the name in the Subject column, and click the Start button.
3. Your meeting will start and the GoToMeeting Organizer Control Panel will appear in the right side of your desktop.
To leave a meeting and allow the meeting to continue
1. From the File menu, select ‘Leave Meeting’.
2. Click ‘Choose an Organizer & Leave’ and then promote an attendee from the drop down list to organizer.
To end a meeting
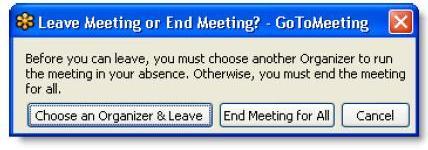 1. From the File menu, select End Meeting.
2. On the ‘End meeting for everyone?’ confirmation dialog box, click Yes.
The Organizer/Presenter Control Panel
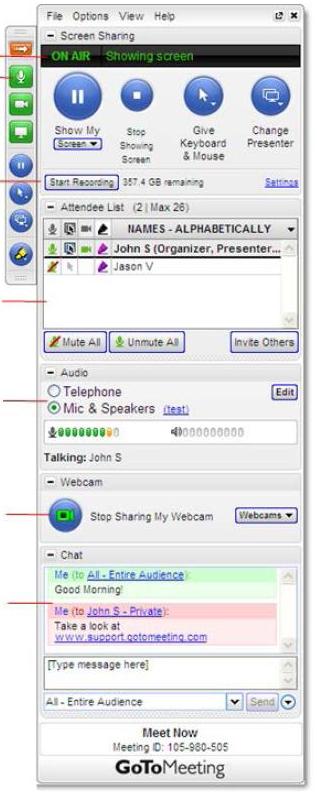 It appears on the right side of the desktop. The Presenter Control Panel gives organizers and presenters access to various functions. The Presenter Control Panel is comprised of following panes:
– Screen Sharing,
– Attendee List,
– Audio,
– Chat, and the
– Grab Tab.
The Organizer Control Panel has a sixth pane, the Recording pane, which can be displayed by selecting View and then Recording from the Organizer Control Panel Bar.
(a) The Screen Sharing pane provides organizers or presenters with a visual reminder of On Air status, as well as the ability to show their screens, pause showing their screens, pass keyboard control and change presenters.
(b) The Grab Tab enables organizers and presenters to minimize the Control Panel to the side of their desktops to display their full desktops to attendees and still access Presenter Screen Tools.
(c) The Recording pane gives PC-based organizers and presenters the ability to record meetings.
(d) The Attendee List pane provides organizers and presenters with a list of all meeting attendees and enables them to make other attendees organizers or presenters, grant or revoke attendee privileges and dismiss attendees. This pane also provides a handy way to invite more attendees.
(e) The Audio pane provides access to the audio settings for organizers, presenters and attendees.
(f) The Webcam pane provides organizers and attendees ability to broadcasting up to 6 high-resolution video conferencing streams while sharing screen.
(g) The Chat pane allows organizers and attendees to communicate privately or publicly and share websites.
Record and Play a Meeting
Meeting recording allows an organizer to record all screen activity that is presented in the GoToMeeting Viewer Window, including desktop and application sharing of other attendees presenting during the meeting.
Before recording a meeting, an organizer must set recording preferences; including selecting the audio format and recording media format (either GoToMeeting format or Windows Media Player format on a PC, and .MP4 format on a Mac). If the Windows Media Player format is selected, GoToMeeting will begin an automatic conversion process immediately after a meeting has ended. Allow time for the conversion to take place. The time needed is dependant upon video content, CPU speed and amount of memory available.
Only one recording file is created per meeting. So, if an organizer clicks Record to start the recording, then stops it and then subsequently restarts it during the course of one meeting, GoToMeeting will continue recording to one meeting recording file.
To record a meeting
1. Click Settings in the Recording pane and confirm that your Audio and Video options are set appropriately.
2. In the ‘Save in’ section, click the Browse button to identify where you would like to save your recording.
3. Click OK to save your settings.
4. In the Recording pane, click the Start Recording button to begin recording.
5. Click Show My Screen to capture the video portion of the recording.
6. Click File and select Exit – End Meeting.
Attending Meetings
Attendee Role Overview
– A meeting attendee can be any person. All that is needed to join a meeting is the meeting ID and/or the meeting password. Attendees do not need to subscribe to GoToMeeting; they meet at no cost to them as guests of the organizer.
– Attendees may be given the role of organizer and/or presenter from the original meeting organizer at any time once a meeting has started.
Join a Meeting
There are many ways in order to join a meeting depending on how you receive the meeting invitation. Joining a meeting requires no pre-registration or configuration.
To join a meeting from an email invitation, Outlook or Lotus Notes meeting appointment or instant message
1. Open the email, appointment or instant message that contains the meeting invitation.
2. Click the link provided in the email to join the meeting.
3. If prompted, click Yes, Grant or Trust to accept the download.
4. If requested, enter the meeting password provided by your meeting organizer.
5. When prompted, type in your name and optionally, your email address.
6. Upon clicking OK in the Name and Email dialog, you will be entered into the meeting.
To join a meeting from the GoToMeeting website
1. Go to www.gotomeeting.com
2. Click the Join Meeting button.
3. If prompted, click Yes, Grant or Trust to accept the download.
4. On the Join a Meeting window, enter the meeting ID you received from your meeting organizer.
5. If requested, enter the meeting password provided by your meeting organizer.
6. When prompted, type in your name and optionally, your email address.
7. Upon clicking OK in the Name and Email dialog, you will be entered into the meeting.
To join a meeting from your desktop
1. If you are an organizer and GoToMeeting is already installed on your computer, you can right-click the icon in the PC system tray or double-click the GoToMeeting icon on a Mac and select ‘Join a Meeting’.
2. On the Join a meeting window, enter the meeting ID you received from your meeting organizer.
3. If requested, enter the meeting password provided by your meeting organizer.
4. When prompted, type in your name and optionally, your email address.
5. Upon clicking OK in the Name and Email window, you enter into the meeting.
To join a meeting from your iPad, iPhone or iTouch
1. Download and install the GoToMeeting App.
2. Open the GoToMeeting app.
3. Enter the meeting ID provided to you by the organizer.
4. Enter your name, email and press Join.
5. Once you press join, you will connect to the meeting.
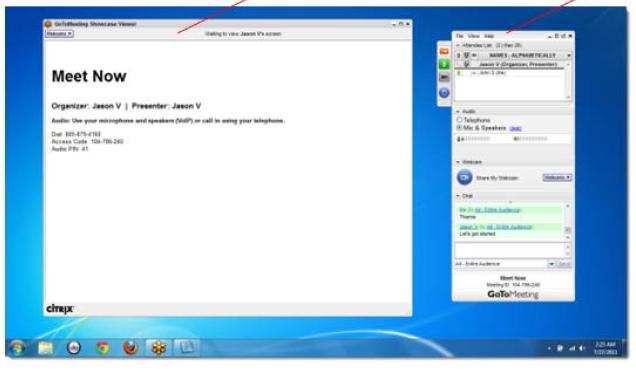
Once attendees join a meeting they see two GoToMeeting attendee components, the GoToMeeting Viewer window (a) and the GoToMeeting Attendee Control Panel (b).
Attendee Control Panel
 When attendees first join a meeting, the Attendee Control Panel appears on the right side of their desktops. The Attendee Control Panel gives attendees access to various meeting functions and is comprised of four panes: the Attendee List Pane, the Audio Pane, the Chat Pane, and Grab Tab.
Attendee Viewer Window
The Viewer window is where the image of the presenter’s desktop is displayed to attendees. The Viewer window can be displayed in either a Window Mode or a Full-Screen Mode.
The GoToMeeting Organizer Website
View your account information, scheduled meetings and previous history by logging into the GoToMeeting website.
To log in to your organizer website
1. Go to www.gotomeeting.com.
2. Enter your email address and password and click Log In.
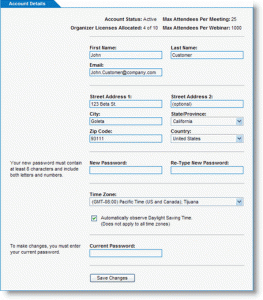
The My Account page enables organizers to view and edit their personal account information, change passwords, set conference call preferences and view billing information and account history.
To edit account information
1. Log in to the organizer web site at www.gotomeeting.com.
2. In the left navigation bar, select ‘My Account’.
3. At the top of the My Account section, enter your current password, make any desired changes and click the Save Changes button at the bottom of the page.
To edit account billing information
1. Log in and select My Account from the left navigation bar.
2. Click Billing Information from the expanded menu.
3. Make any desired credit card or billing address changes and then click ‘Save Changes’ at the bottom of the page.
Tips for Success
– Turn-off any instant messaging or other programs that may distract from meeting.
– Turn off streaming media applications that may take up internet bandwidth along with any resource-intensive applications.
– Set a plain background and adjust display settings to a mid-range resolution to improve the display. This is also the optimal setting for recording a meeting.
– Remove unnecessary icons and clean up your desktop before a meeting.
– Have all the documents accessible in minimum clicks.
